Category Archives: Tuscan Vineyard
Tuscan Photographic Workshop Tour June 18 – June 23, 2016
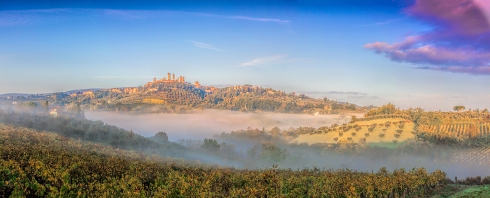
San Gimignano in the Mist
The best photographs are often accompanied by the memories that are attached to the image. Your own personal metadata is what makes your images and traveling so important.
This was a wonderful morning image that I captured in 2013 in Sangimino, Italy and is one of my favorite memories.
What makes it my favorite is the smile it brings to my face when I see it. We had arrived and could see the village in the soft morning light before sunrise. Everyone knew it was going to be a great shot. Once I parked the van, everyone dashed of a few steps ahead of Jan and I. Craig, Charlie, Steve, and Bob headed off into the tall wet grass to try to find a vantage point to shoot from and Jan gave me a look that still makes me laugh every time I see this image. There was a little farm road that went up and off to the left of the wet grass, it took Jan and I to this great (and dry) vantage point. As we watched the light change we captured this wonderful sunrise. The men eventually came out of the wet brush and onto the farm road to capture Sangimino from what I think of as Jan’s vantage point.
A journey shared is a journey remembered.
Click here to get to my Links page for the 15% off discount code for any of the Topaz products
Leave a comment | tags: Paul Christopher James, Topaz Clarity, Topaz Labs, Tuscany photo workshop | posted in Florence, Lightroom, Photographic Workshops, Photoshop CS6, San Gimignano, Siena, Topaz Clarity, Topaz In Focus, Topaz Labs, Topaz labs, Tuscan Photo Workkshop, Tuscan Vineyard, Val d'Orcia, Wheat fields
Sunrise anywhere on the planet is always a great time to start shooting. The rain and mist mixed with this morning’s soft light in Michigan would have made for great location shooting. With a little luck we will have a variety of weather for the Italian and French workshops coming up in 6 weeks.
Awakening – Montepulciano, Italy
Click here To receive $200 off The Topaz Collection use the coupon code SPRINGSUMMER2016
The Topaz Collection includes 17 products for only $499.99. With the 40% discount, new users can purchase the entire collection for ONLY $299.99! The savings aren’t just for new collection purchases either. Owners of the older Topaz Collections can take advantage of the savings as well! They will just need to log in to their accounts to see their unique Collection upgrade price. Apply the code ‘SPRINGSUMMER2016’ for 40% additional savings! May 3rd through May 22nd.
Click here to get to my Links page for the 15% off discount code for any of the Topaz products
Leave a comment | tags: Italian Photographic Workshop, Paul Christopher James, Topaz Clarity, Tuscany photo workshop | posted in Cinque Terre, Cinque Terre photo workshop, Florence, Focus Stack, HDR, lavender fields, Lens Correction, Lightroom, Montepulciano, Perspective, Photographic Workshops, Photoshop, Provence Photo Workshop, San Gimignano, Selective focus, Siena, Topaz Clarity, Topaz labs, Tuscan Photo Workkshop, Tuscan Vineyard, Val d'Orcia, Wheat fields
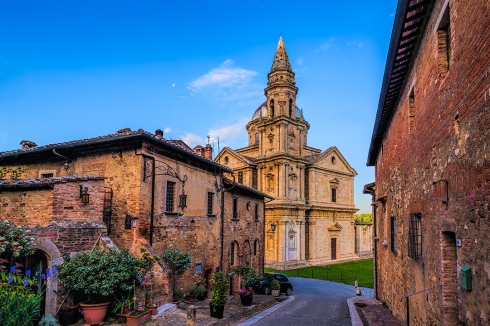
Florence is a terrific place to start an Italian adventure. It was built by the Romans and transformed by the Renaissance into one on the great art capitals of the world. There are still a couple of places left on the Tuscan workshop.
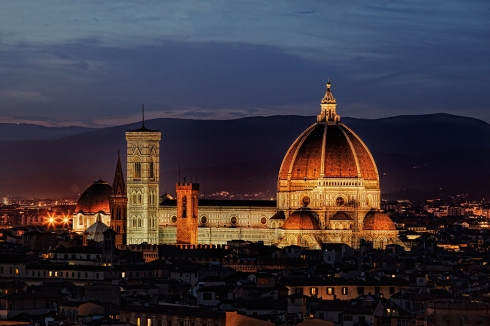
Duomo Florence
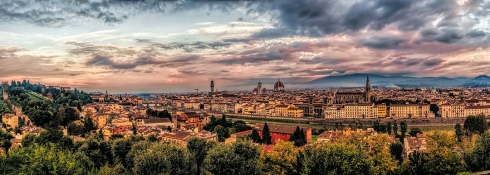
Florence, Italy
Our first stop in Tuscany will be San Gimignano, a small walled village an hour north and Siena, it is famous for its medieval architecture and towers that rise above of all the surrounding buildings offering an impressive view of the city from the surrounding valley.
After our morning shoot in San Gimignano, we will be heading to Siena to explore this wonderful medieval village where Leonardo da Vinci enjoyed spending time.
After Siena we will be staying in the Val d’Orcia which is the wheat belt of Tuscany. The Val d’Orcia is an hour south of Siena with the Bagno Vignoni on its west side and the ancient Roman village of Pienza on its east. In the Heart of the Tuscan region we’ll be capturing images, with time set aside to soak in the hot mineral waters of the Bagno, a little wine tasting, and a cooking class for anyone who is interested. We will spend some time processing images using Photoshop’s Lightroom and Topaz and Nik Software plug-ins to help improve your processing skills.
Click here to get to my Links page for the 15% off discount code for any of the Topaz products
Leave a comment | tags: Digital Photographic Workshop, Paul Christopher James, Topaz Clarity, Topaz Labs, Tuscany photo workshop | posted in Florence, Paul Christopher James, San Gimignano, Topaz Clarity, Topaz Clarity, Topaz Labs, Tuscan Photo Workkshop, Tuscan Villa, Tuscan Vineyard, Val d'Orcia, Wheat fields
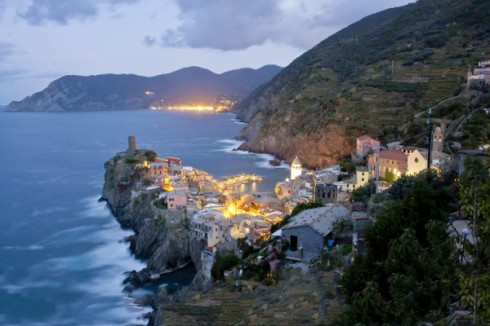
Vernazza and Monterosso at Night captured by Vince Cordi
Congratulations to Vincent Cordi for winning a Trafalgar trip to Northern California valued at $6,000 dollars!! For me the best part of teaching location workshops is the shared learning and travel experience where I have made lasting friendships. Having clients come home with award winning images is a bonus.
Leave a comment | tags: Charleston Photographic Workshop, Digital Photographic Workshop, Italian Photographic Workshop, Paul Christopher James, Smoky Mountain Photo Workshop, Topaz Clarity, Venice Photo Workshop | posted in Italian Photographic Workshop, Italian Riviera, Italy, Manarola, Manarola Italy, Montepulciano in Tuscany, Paul Christopher James, Tuscan Photo Workkshop, Tuscan Photo Workshop 2013, Tuscan Villa, Tuscan Vineyard, Tuscany, Val d'Orcia, Venice, Venice Cafe, Venice Italy Photographic Workshop

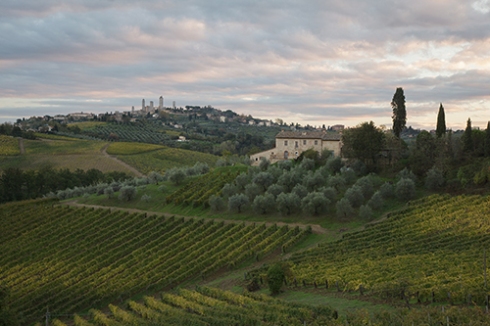
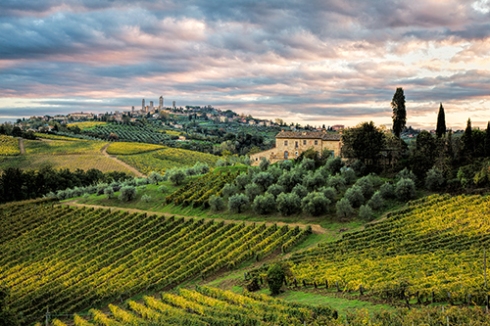
San Gimignano, Topaz Clarity finished with Topaz Lens Effects, Vignette
I captured this image of San Gimignano, Italy at sunset in late October in 2012 while teaching a workshop. The sky that evening had some clouds but not where I needed them and so we waited. The clients had taken some nice images of San Gimignano with the vineyards in the foreground and a clear blue sky. We had starting the days shooting before sunrise and everyone was getting a little antsy and were ready for dinner. A few had already pack up and were waiting by the van to head home for the night.
I knew that the best chance for everyone to get a great image we needed to wait for the light. I had been on location once when the sky was uninteresting and decided to pack up and leave only to see a spectacular sunset in my rear view mirror. There is never any guaranties on what type of light we will have when we are out shooting but I can guarantee that we will be at great locations capturing the changing light and waiting for the the magic to happen.
San Gimignano, unprocessed image
This unprocessed image was captured as the clouds rolled in after sunset with an aperture of F/11 at .5sec. After the sun set I was able to eliminate clipping in both the highlight and shadow areas.

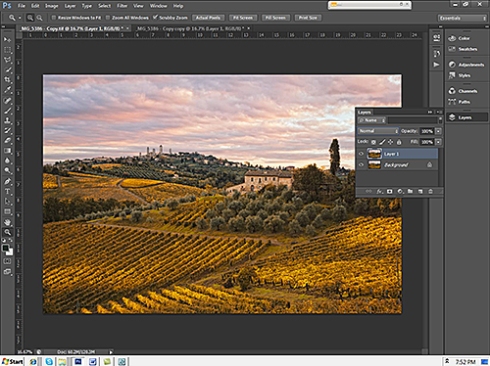
Topaz Clarity Color and Contrast Boost II
I decided to process this image using Topazes new clarity software. Often I will stack an image in layers and this worked well for this image. The 1st layer I applied Color and Contrast Boost II and liked the effect but like Oliver Twist I always want a little more. The next layer I applied CityScape II and which I liked even more but kept looking at other affects and liked Macro II. All these effects were processed in progressive layers with Topaz’s Clarity software. But always wanting a little more I decided to vignette this image using the Lenses Effects software by Topaz and was excited with the finished image.
Topaz Clarity CityScape II

Topaz Clarity, Macro II
3 Comments | tags: Italian Photographic Workshop, Paul Christopher James, Sunset, Tuscany photo workshop, Venice Photo Workshop | posted in 2013 Italian Photographic Workshop, Paul Christopher James, Photographic Workshops, Photoshop CS6, Topaz Clarity, Topaz Labs, Tuscan Photo Workshop 2013, Tuscan Villa, Tuscan Vineyard, Venice Italy Photographic Workshop
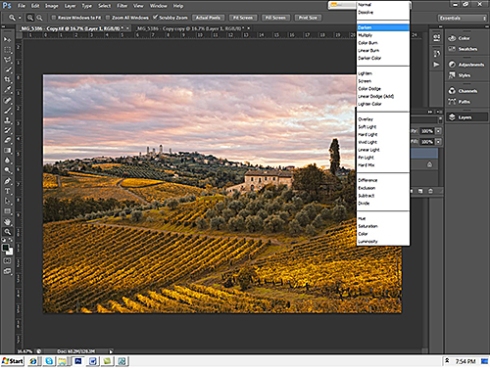
To make Exposure adjustments using Blend Modes you first make a layer. When you make a duplicate or copy layer it opens in Normal Mode and has an Opacity of 100% in the layers pallet. Normal Mode does not change the appearance of the image. In the Layers Pallet Layer 1 automatically becomes an active layer and the Blend Modes become active and you are able to change the Blend Mode and Opacity of this layer.
Duplicate Layer-Normal Blend mode
I find blend modes the most effective way to make exposure adjustments. In the Layers Pallet to the right of the word normal lick on the arrows and a menu pops up, scroll through each Blend Mode in the menu to see how they affect the image. The two I use to affect exposure are Screen and Multiply.
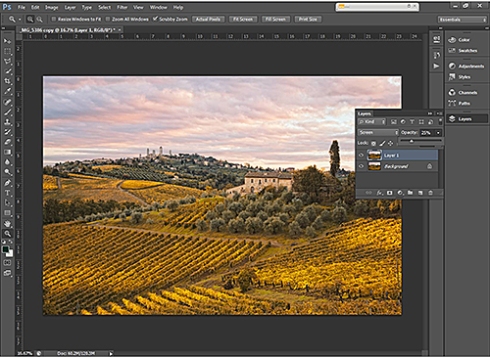
Make a selection in Blend Mode
I selected Screen mode to lighten the image, this will usually make the image to light but by clicking on the arrow next to 100% and moving the slider to 25% for this images, I lighten the image to the exposure I want.
Blend Mode – Screen 25%
I selected Multiply mode to darken the image, this will usually make the image to dark but by clicking on the arrow next to 100% and moving the slider to 25% for this images I darken the image to the exposure I wanted.
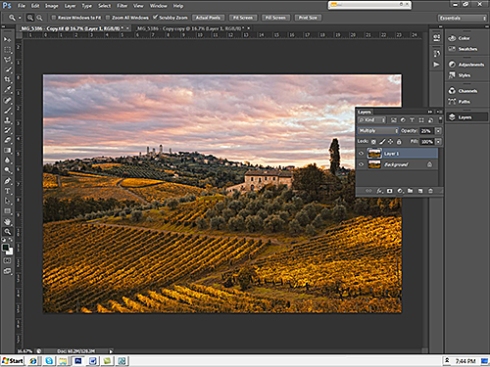
Blend mode – Multiply 25%
Leave a comment | tags: Digital Photographic Workshop, Italian Photographic Workshop, Nik Software, Paul Christopher James, Tuscany photo workshop | posted in 2013 Italian Photographic Workshop, Adobe CS6, Blend Modes, Color Effex Pro, Exposure Adjustments, Italian Photographic Workshop, Nik Software, Paul Christopher James, Photoshop Elements 11, San Gimignano, Tuscan Photo Workshop 2013, Tuscan Vineyard
If your exposure is over or under exposed you can make adjustments with the exposure slider in Camera Raw. I had already worked with this image and saved it as a tif. In Photoshop if you go to File – Open As the image can be opened in Camera Raw like the original raw image.
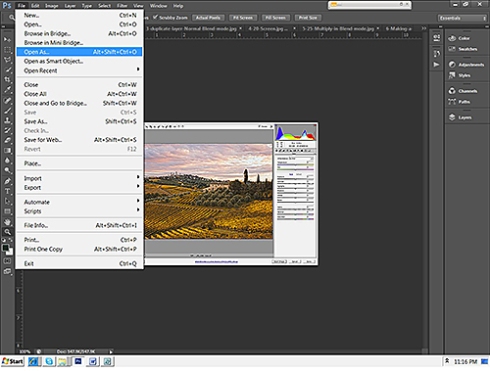
File-Open As
To select a tif or jpg file by left clicking on it.
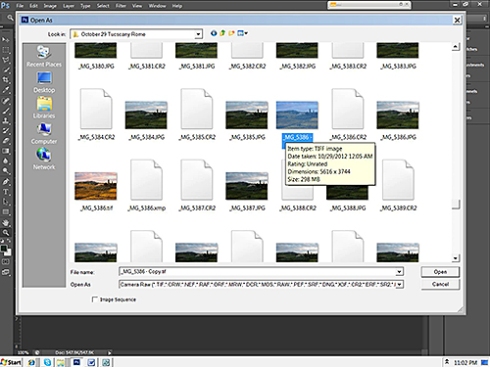
Select the tif or jpg file to open in Camera Raw
In the Open As dialog box to the right of Open As at the bottom of the dialog box click on the arrow and select Camera Raw for the file to open in Camera Raw.
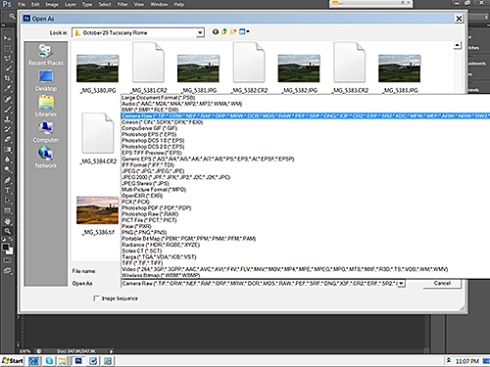
Select-Open As-Camera Raw
I had already processed this image. In order to demonstrate how to make an exposure composition I have moved the exposure slider the left to -0.50 which under exposes the image and makes the image darker. If I had moved the exposure slider to the right to +0.50 it would make the image lighter and over exposed the image.
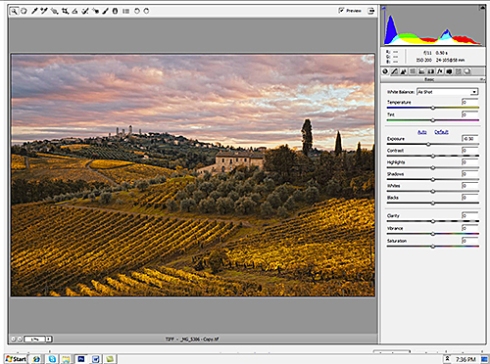
-0.50 exposure Slider
I moved the exposure to the left +0.50 stop to 0 to lighten the image to the exposure I liked best. This is also the exposure that I captured in the Camera. I try to expose and crop the image in the Camera to create the best possible file. My goal as a photographer is to use Photoshop to make a good image better not make a poor image usable. In Photoshop Elements 11 and CS6 you can make adjustments up to 5 stops plus or minus but I find that if you have over of under exposed the image by more than 2 stops your recovery efforts will brings poor results.
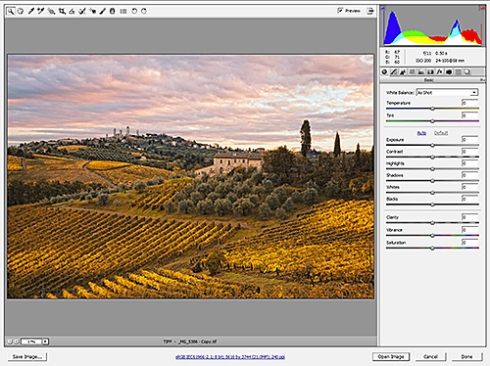
xposure slider adjustment to 0.00
Leave a comment | tags: Digital Photographic Workshop, Nik Software, Paul Christopher James, Tuscany photo workshop | posted in Adobe CS6, Cypress Trees, Digital Photo Workshop, Nik Software, Paul Christopher James, Photoshop Elements 11, San Gimignano, Tuscan Harvest, Tuscan Photo Workkshop, Tuscan Photo Workshop 2013, Tuscan Villa, Tuscan Vineyard, Uncategorized, Vineyards
During the Italian October workshop Janice Maguire a portrait photographer from New Jersey captured this image in Chianti Tuscany just south of Florence. Her composition has the grape vine leading you into the picture with the fence poles, road and rolling vineyards draws your eye across the image to the mist. The clouds and light of this amazing sunset was a gift we all enjoyed capturing
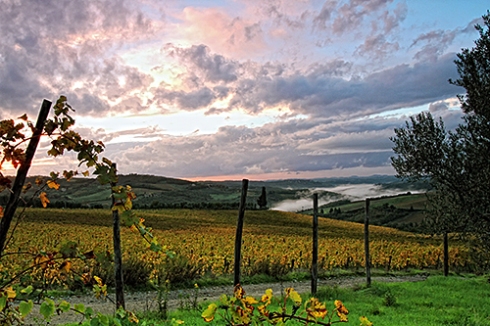
Tuscan Mist at Sunset
This image was processed using Film Effects in Nik Software’s Color Efex Pro.
Leave a comment | tags: Digital Photographic Workshop, Italian Photographic Workshop, Nik Software, Paul Christopher James, Paul James, Sunset | posted in 2013 Italian Photographic Workshop, Adobe CS6, Color Effex Pro, Digital Photo Workshop, European Images, F-Stop, Nik Software, Tuscan Vineyard
Last fall I spent 2 weeks teaching Photographic Workshops in the Chianti area of Tuscany, Italy. We stayed at a Agriturismo that was an working vineyard south of Florence, each day we started with a sunrise shoot then head back to the Agriturismo for breakfast. After breakfast we would explore nearby villages for more images and a little shopping. I find that my best images are normally captured at sunrise and sunset except when you are lucky enough to have scattered showers thought the day. When everything is drenched from a fresh rain it enhances the colors. If you are luck enough to have partial overcast, as in this image, your colors are not washed out from the bright sunlight. The mix of blue sky and clouds helped to give this image it’s finishing touch.
Raw CR2 File

Siena Farmhouse – CR2 Raw image
This histogram looks good but the image looks a little dark. In the Basics Pallet, I start with the Exposure slider by moving the slider to +0.20 to brighten the image. This changes the Histogram by shifting the information to the left and created a little clipping in the highlights. To compensate for the clipping, I shifter the Recovery slider to 11 which shifted the highlighted area back to the right and eliminates the clipping.
The next step is to adjust for White Balance, this can be done by manually adjusting the Temperature and Tint sliders or using the dropdown menu. Using the dropdown menu to check the presets, with this image I liked the Daylight preset of 5500 Kelvin and +10, this added the warmth you normal see during daylight hours.
The next adjustment I made was Clarity which adjusts midtone contrast. This is a wonderful adjustment which brought out crisper detail in this vineyard image. With the Vibrance slider I added +40 to bring out the saturation in the midtones. I love this adjustment, it adds a much subtler saturation than you can achieve with the Saturation slider. In this case it enhanced the blues in the sky and richened the tones throughout the image.
Basic Pallet

Siena Farmhouse – Camera Raw 6.1 Elements 9 Basic Pallet
The next adjustment I made was in the Camera Calibration pallet, to bring out the colors in this fall vineyard image. Using the Camera Profile dropdown menu I selected Camera Landscape, to bring out all the colors I remembered seeing in this wonderful image near Siena in Tuscany.
Camera Calibration

Siena Farmhouse – Camera Calibration – Camera Landscape
The Last adjustment I made was in the Detail Pallet. Right click on your screen and bring the image to 100%. By bringing the image to 100% you will be able to see the effect the sharpening is having on the image. On this image I set the Sharpening Amount at 100 with the pixel Radius at 1.1 and the Detail at 25, which are the setting I use 90% of the time. With most images I find that if I set the Amount between 75 and 150 with the pixel Radius between .75 and 1.5 and the Detail amount at 25, I achieve my best results.
Detail Pallet

Siena Farmhouse – Detail Pallet – Sharpening
With just a few minuets of processing in Adobe Camera Raw 6.1 in Elements 9 we have a printable image that will bring out the beauty of this Siena Farmhouse.

Adobe Camera Raw 6.1 - Elements 9 - Siena Farmhouse
I will work with this image for several more hours to bring out the colors and clone out antennas and other distractions but for all practical purposes this image is ready for printing.
Leave a comment | tags: Digital Photographic Workshop, European Images, Florence Photographic Workshop, Italian Photographic Workshop, Nik Software, Paul James, Photoshop training, Tuscany photo workshop | posted in Adobe Camera Raw 6.1, Adobe Elements 9, Chianti Italy, Chianti Italy Photo Workshop, Italian Photographic Workshop, Photographic Workshops, Siena Farmhouse, Tuscan Photo Workkshop, Tuscan Vineyard


